Posts

Showing posts from August, 2013

Just add a few flowers!

Image
It's crazy how just a flower arrangement can change the look of a space.   Our breakfast nook has a white table, 4 chairs, some window panels that I plan to replace sooner than later and it just seems so bare...like something is missing.  It is such a small space that I really haven't wanted to add much to avoid "clutter" so I just did a simple arrangement and Im loving the look.  

Dancing in the rain

Image
Playing in the rain....

Beach ball piñata

Image
I'm having my sons 2nd bday party at our pool in our new neighborhood this year and I decided to do a beach ball theme since there was a beach ball on our splish splash invitation. I looked up beach ball piñatas and they weren't too bad in price but the shipping was high so I decided to make one myself.   I think the last time I did anything like this was 4th grade, so of course I looked up how to make a piñata but created the beach ball myself.    I used a perfectly round balloon $1.00  Equal parts flour and water  Newspaper  Crepe paper $1.00 each x 6 colors $6.00 String that I already had so basically I saved $15.00  It took me a total of about 5 days to let the newspaper dry then did another layer let it dry then added the crepe paper and waited for it to dry.   I still need to add candy and close off the top.  Can't wait to watch the kids break it open.  It was also a fun project for the kids to work on since it was messy :) 

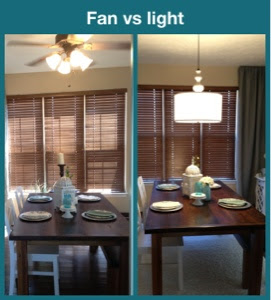
Out with the fan in with the light

Image
                                    So excited about my new drum light.  I searched and searched and finally found one on overstock.com for a very low price.    I am a very impatient person when it comes to decorating so I decided to do this by myself and if wasn't hard at all.   Basically you need to know a little bit about wiring and making sure you shut off the power to that room or the whole house if need be!    I removed this ceiling fan first and then figured out the length I wanted for the light and connected all wires and hung it up.                                                                                                                                               Exactly what I imagined! I just love eating in my beautiful dining room.  Can't wait for our first dinner party :) 

Bedroom makeover time

Image
I can't believe we've only had this dresser and nightstand set for 5-years...it shows but it just doesn't seem that long.  I really didn't and don't want to have this new project because its just so tedious but the outcome is always fun.   I started with one nightstand to make sure it looked good enough to do the dresser and other nightstand.  Of course I used my favorite solution "deglosser" to begin the process.  Here's the OLD...so scratched up and ready to be renewed!  The process... The finished product... Also notice the lamp...it basically looked like this ( I forgot to take a pic of the before)  While I was waiting for paint to dry I decided to fix the lamp up too... Just a little spray paint, gray on shade and white on lamp. Now the dresser is next...ughghg