Picture Wall
I decided in our new home I wouldn't put family photos throughout the entire home but instead limit them to just one area!


Since we have the space and a large hallways upstairs I found the PERFECT WALL to make my "PICTURE WALL"
I used a very odd method but it worked out so great I've used it again and always will if need be...
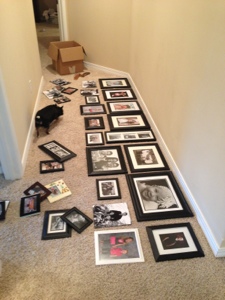
First I laid all pictures on the floor, this was the hardest part...placing them in the correct spot to make a perfect rectangle.
It took me forever but after about an hour I got it! As you may tell In the last picture I changed the placement more...
I started with the right side pictures top to bottom, then to continue on and get them exactly how I had them on the floor without the annoying measuring, I used a special tool that was right across the way in my sons room " DESITIN" Diaper rash ointment! Hmmmmmm, well....it was the closest thing I could find and I just squeezed some out on my finger, put it on the hanging device on the back of the frame and then I stuck the frame up to the wall next to the picture it was next to on the ground, gave it a little push, removed pic away from wall and wherever the desitin was is where I nailed in the nail and so on with ALL PICTURES.
WHA LA....perfecto and exactly how I wanted it :).


Comments
Post a Comment