Trying to stay fashionable and keeping your house looking good while raising kids and going going going non-stop!
New door wreath/initial
Get link
Facebook
X
Pinterest
Email
Other Apps
I needed to change out my wreath from Target, the artificial berries have been falling off and break off so easily so I decided to do the whole initial thing. Very simple, just paint, little pattern, and burlap and wa la!
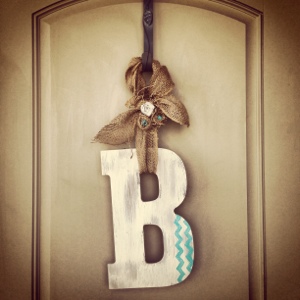
I originally saw this idea online but I did things a little different then what I read so I thought I'd share my techniques to make this easy and satisfying :). My first step was to paint the entire wall, basically bc it was a flat paint before and I changed it to eggshell. Obviously walls vary in size so you will just need to determine how close you want the stitching. We tied a pencil at the end of a rope and then tacked it in the corner then drew from one side to the other to get the long line. Make sure u hold the pencil outright and not slanted at all! Then do the other line in the opposite corner. I traced the line with a thin paintbrush using a gray paint we had already. It's ok if the line isn't exactly the same thickness ! If u look close you can see mine varies in thickness. The best thing I did was make a stencil from a scrap piece of cardboard for the stitching. And I didn't...
What's everyone's input on this spike jewelry being IN right now? I went into Staxx today and most of the jewelry was the spike jewelry. It's all over the Internet as well. I've also seen so many celebrities wearing them!!! Give me your opinion...like? Don't like?
You need: apx 2yds of 2 different fabrics, coordinating thread, and a sewing machine :) I used a 100% cotton as the red to prevent too much sliding on the table, I also washed it before I did anything. R 1. Cut the fabric to a size you want, I did a 14" x 64" runner. 2. Cut the top part the size you want than the lower fabric about 1 1/2" bigger on each side. 3. Lay bottom fabric under top and fold edges over once, iron, than fold again over the fabric, iron, pin in place. (ironing really helps keep things in place) 4. Fold corners in to your liking, it took me a bit to figure out how I wanted the corners , once I did I cut off any excess to avoid bulkiness. Pin down corners and than start sewing! 5. Finally spray starch and iron. As you can see I made matching place mats. I made these for a Christmas gift for my mom. So easy and pretty I will be making her 2 more placemats for when she extends her table for company. ...
Comments
Post a Comment