Posts

Showing posts with the label MY HOME

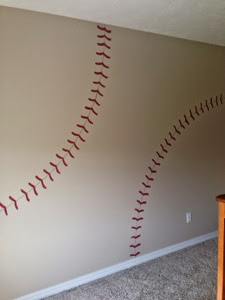
Baseball stitch wall
Image
I originally saw this idea online but I did things a little different then what I read so I thought I'd share my techniques to make this easy and  satisfying :). My first step was to paint the entire wall, basically bc it was a flat paint before and I changed it to eggshell.   Obviously walls vary in size so you will just need to determine how close you want the stitching.   We tied a pencil at the end of a rope and then tacked it in the corner then drew from one side to the other to get the long line.  Make sure u hold the pencil outright and not slanted at all!  Then do the other line in the opposite corner.   I traced the line with a thin paintbrush using a gray paint we had already.  It's ok if the line isn't exactly the same thickness ! If u look close you can see mine varies in thickness.  The best thing I did was make a stencil from a scrap piece of cardboard for the stitching.  And I didn't...

Buffet

Image
I finished the buffet!!! Yay!  I actually finished a while ago but I'm just now posting due to me being busy preparing for my daughters "Princess Tea Party" ( which I will post pictures in).   I need to sand the doors down a but as they are rubbing with the xtra layers if paint.  So,  like I mentioned before my mom brought this over to me from her garage. It needed some MAJOR TLC!   I had to cut a piece of wood to fix this broken leg!  Just glued in on, sanded, used wood filler, sanded, sanded, sanded!  Definitely had to keep the original hardware!  Spray painted them black and the original hinges were rusted so I just bought new hinges! This thing came from a garage sale and it was so nasty in and out.   I sanded lightly but used the liquid sander deglosser as it's my favorite :)  The drawer was gross it has a purple Nasty velvet liner that stunk and was a pain to remove. :(  Ok, so my initial pl...

Rustic headboard

Image
Instead of an upholstered headboard I decided to go with something a bit more rustic and instead of using pallets like I had originally planned I just used good ol' cheap whiteboard from the hardware store. Have you EVER tried to take a pallet apart? It's not an easy task at all!  I bought 2-10'  pieces an 8' piece of whiteboard and had the 8' cut in half for 2-4' posts then the other cut  into 4-54" pieces for the horizontal slats.    Once it was all together I slapped on a few streaks of off white flat paint and while it was still just a tad bit wet I used a cheesecloth and wiped on some Martha Stewart glaze.  It turned out beautifully and the pictures do not even do it justice, as I was adding the glaze I was smiling ear to ear watching the magic happen.   :)

Just add a few flowers!

Image
It's crazy how just a flower arrangement can change the look of a space.   Our breakfast nook has a white table, 4 chairs, some window panels that I plan to replace sooner than later and it just seems so bare...like something is missing.  It is such a small space that I really haven't wanted to add much to avoid "clutter" so I just did a simple arrangement and Im loving the look.  

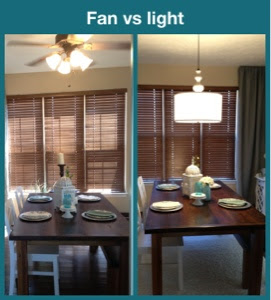
Out with the fan in with the light

Image
                                    So excited about my new drum light.  I searched and searched and finally found one on overstock.com for a very low price.    I am a very impatient person when it comes to decorating so I decided to do this by myself and if wasn't hard at all.   Basically you need to know a little bit about wiring and making sure you shut off the power to that room or the whole house if need be!    I removed this ceiling fan first and then figured out the length I wanted for the light and connected all wires and hung it up.                                                                                    ...

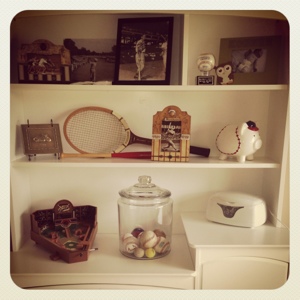
Vintage Sports Room in the works

Image
I am still trying to decorate Konner's room in the "Vintage Sports Theme", it's taking a while because I am very picky about what Vintage Sports items I will put in his room. Here's what I've got so far but like I said, " in the works" so on far from done.

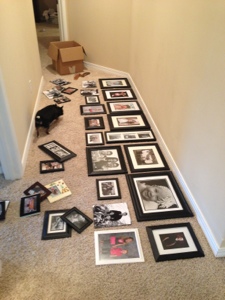
Picture Wall

Image
I decided in our new home I wouldn't put family photos throughout the entire home  but instead limit them to just one area! Since we have the space and a large hallways upstairs I found the PERFECT WALL to make my "PICTURE WALL"  I used a very odd method but it worked out so great I've used it again and always will if need be... First I laid all pictures on the floor, this was the hardest part...placing them in the correct spot to make a perfect rectangle.   It took me forever but after about an hour I got it!  As you may tell In the last picture I changed the placement more... I started with the right side pictures top to bottom, then to continue on and get them exactly how I had them on the floor without the annoying measuring, I used a special tool that was right across the way in my sons room " DESITIN" Diaper rash ointment!  Hmmmmmm, well....it was the closest thing I could find and I just squeezed some out on my finger, put it...

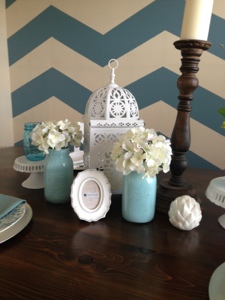
Painted mason jars

Image
Oh how I've been wanting to do this FOREVER! I didn't want to make the paint do I've just slacked a bit, however, I was at a very small local antique shop and saw the ALREADY PREPARED paint YAYAYA! Super simple just use any mason jar or any type of glass container for that matter and just add a little bit of your paint and just hold it up and turn it and move it to where the paint coats the jar!  Don't worry about the rim because you will just turn the jar upside down to let all the excess drain out and it will coat the rim!  One small tip:  when turning upside down to drain place on something that you can drain the excess paint back into your paint container. Try not to use newspaper because it will rip and soak it up...you'll be surprised how much comes out and can be used on another fabulous project.